The most common issue encountered by beginning trumpet students is an apparent jam in the trumpet. Air blown into the trumpet refuses to pass through, rendering the instrument unplayable. While there are many possible causes, it’s most likely that one or more of the valves has been turned from its proper position, blocking the air flow. This post details the most common causes of this problem, and how to fix them.
Valves
When diagnosing the cause of blocked airways in the trumpet, it is important to pay attention to some aspects of the trumpet valve.
[b]1. Valve Numbers[/b]
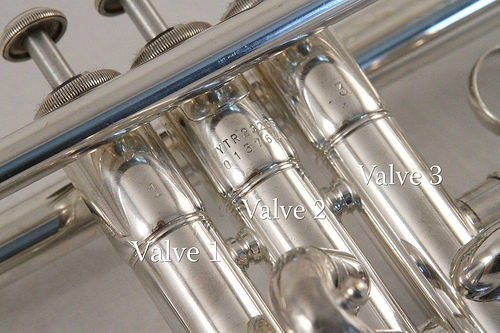
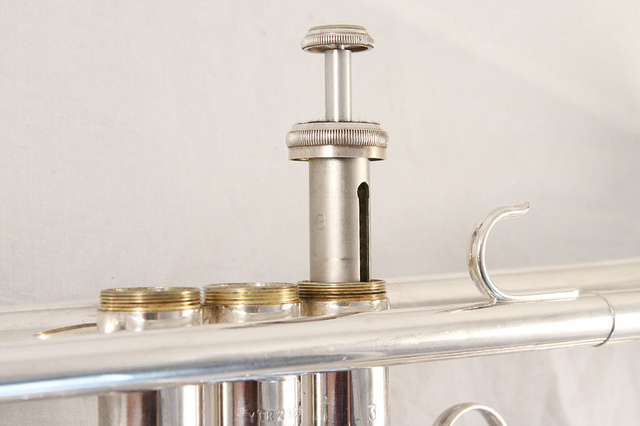
In most cases, trumpet valves are numbered, with “1” being the closest to the mouthpiece, and “3” being the closest to the bell. If the valves are not numbered, try and match up the openings on each valve with the pipes on the outside of each valve casing, as detailed in the image below. It is very important that the valves are inserted in the proper order, as each is designed specifically to match the openings within the valve casings.
[img]http://farm7.static.flickr.com/6024/6002456532_da40a09a7f.jpg[/img]
[b]2. Valve Guides[/b]
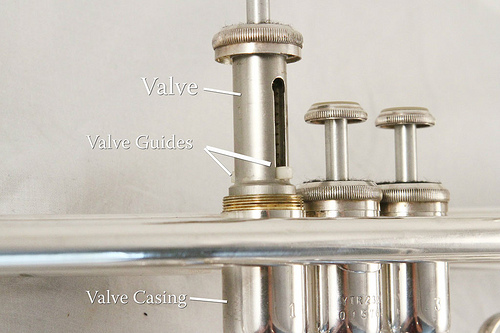
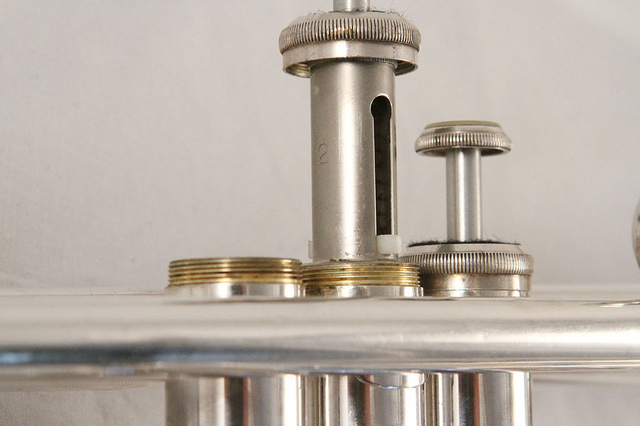
On either side of each valve are small, usually plastic parts, located just under the stem. These parts, called valve guides, hold the valve in place inside the trumpet. To ensure that your valves are aligned properly within each valve casing, line up the valve guides with each other, and make sure that each valve is facing the same direction as the others (often, one valve guide is smaller than the other, allowing you to differentiate one side from the other). In most cases, the valve guides face either side of the trumpet, away from both the bell and mouthpiece.
[img]http://farm7.static.flickr.com/6149/6002456456_1684ab89b7.jpg[/img]
[b]Fixing the Problem[/b]
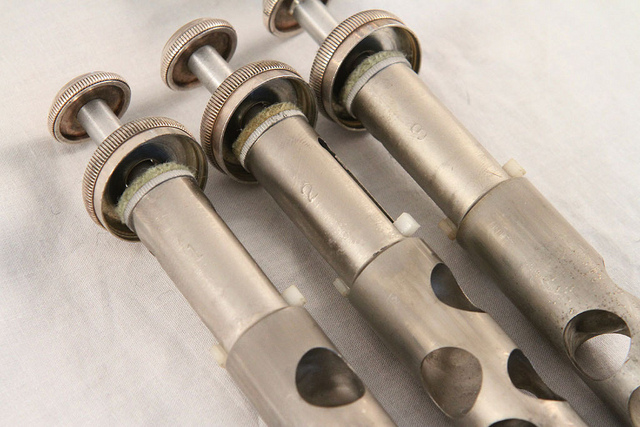
Begin by removing all three valves from the trumpet. If, at this point, the trumpet still does not blow freely, skip ahead to “Clearing a Block.”
Insert the 3rd trumpet valve into the casing closest to the bell, rotating it until the horn blows freely regardless of the valve’s up/down position; the valve guides should click the valve into place. Repeat this process with the 2nd, and finally 1st valve. At this point, air should pass freely through the trumpet.
All three valves removed:
[img]http://farm7.static.flickr.com/6014/6002456584_8a1df654ce_z.jpg[/img]
Third Valve in Trumpet properly aligned:
[img]http://farm7.static.flickr.com/6127/6001908231_78e9e04ed2_z.jpg[/img]
Second Valve Next:
[img]http://farm7.static.flickr.com/6015/6002456402_886285b5ee_z.jpg[/img]
First Valve Last:
[img]http://farm7.static.flickr.com/6127/6001908139_8d8de9b918_z.jpg[/img]
TIP: When lining up the valves, it may be helpful to take note of the position of the number etched on the valve; they often point directly toward the mouthpiece when correctly lined up for brands such as Bach, Jupiter, Yamaha, LJ Hutchen, etc. With that said, some manufacturers etch the valve numbers so they face sideways, and others so they face the bell. If once your 3rd valve is “locked” in no air will pass through the trumpet, then try rotating it 90 degrees.
[b]Clearing a Block[/b]
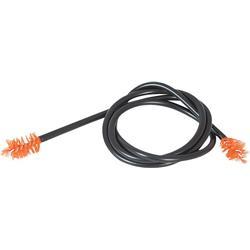
If all the valves have been checked and still the trumpet refuses to play, there is likely a blockage of some sort within the instrument. Blocks causing a complete stoppage of airflow are likely to occur before air reaches the valves, so take a moment to identify the location of the block. Remove the tuning slide and blow through the trumpet, from the end of the leadpipe. If airflow is blocked, run a cleaning snake brush (image below) through the leadpipe to clear the blockage until you can blow through it freely. If the blockage is not located, repeat this process for the tuning slide itself. If the blockage still cannot be located, the aid of a musical instrument repair professional may be needed.
The most common issue encountered by beginning trumpet students is an apparent jam in the trumpet. Air blown into the trumpet refuses to pass through, rendering the instrument unplayable. While there are many possible causes, it’s most likely that one or more of the valves has been turned from its proper position, blocking the air flow. This post details the most common causes of this problem, and how to fix them. When diagnosing the cause of blocked airways in the trumpet, it is important to pay attention to some aspects of the trumpet valve.
1. Valve Numbers
In most cases, trumpet valves are numbered, with “1” being the closest to the mouthpiece, and “3” being the closest to the bell. If the valves are not numbered, try and match up the openings on each valve with the pipes on the outside of each valve casing, as detailed in the image below. It is very important that the valves are inserted in the proper order, as each is designed specifically to match the openings within the valve casings.
2. Valve Guides
On either side of each valve are small, usually plastic parts, located just under the stem. These parts, called valve guides, hold the valve in place inside the trumpet. To ensure that your valves are aligned properly within each valve casing, line up the valve guides with each other, and make sure that each valve is facing the same direction as the others (often, one valve guide is smaller than the other, allowing you to differentiate one side from the other). In most cases, the valve guides face either side of the trumpet, away from both the bell and mouthpiece.
3. Fixing the Problem
Begin by removing all three valves from the trumpet. If, at this point, the trumpet still does not blow freely, skip ahead to #4, “Clearing a Block.”
Insert the 3rd trumpet valve into the casing closest to the bell, rotating it until the horn blows freely regardless of the valve’s up/down position; the valve guides should click the valve into place. Repeat this process with the 2nd, and finally 1st valve. At this point, air should pass freely through the trumpet.
TIP: When lining up the valves, it may be helpful to take note of the position of the number etched on the valve; they often point directly toward the mouthpiece when correctly lined up for brands such as Bach, Jupiter, Yamaha, LJ Hutchen, etc. With that said, some manufacturers etch the valve numbers so they face sideways, and others so they face the bell. If once your 3rd valve is “locked” in no air will pass through the trumpet, then try rotating it 90 degrees.
All three valves removed
Third valve properly aligned
Second valve properly aligned
First valve properly aligned

4. Clearing a Block
If all the valves have been checked and still the trumpet refuses to play, there is likely a blockage of some sort within the instrument. Blocks causing a complete stoppage of airflow are likely to occur before air reaches the valves, so take a moment to identify the location of the block. Remove the tuning slide and blow through the trumpet, from the end of the leadpipe. If airflow is blocked, run a cleaning snake brush (image below) through the leadpipe to clear the blockage until you can blow through it freely. If the blockage is not located, repeat this process for the tuning slide itself. If the blockage still cannot be located, the aid of a musical instrument repair professional may be needed.
Yamaha Vinyl-Coated Trumpet Cleaner